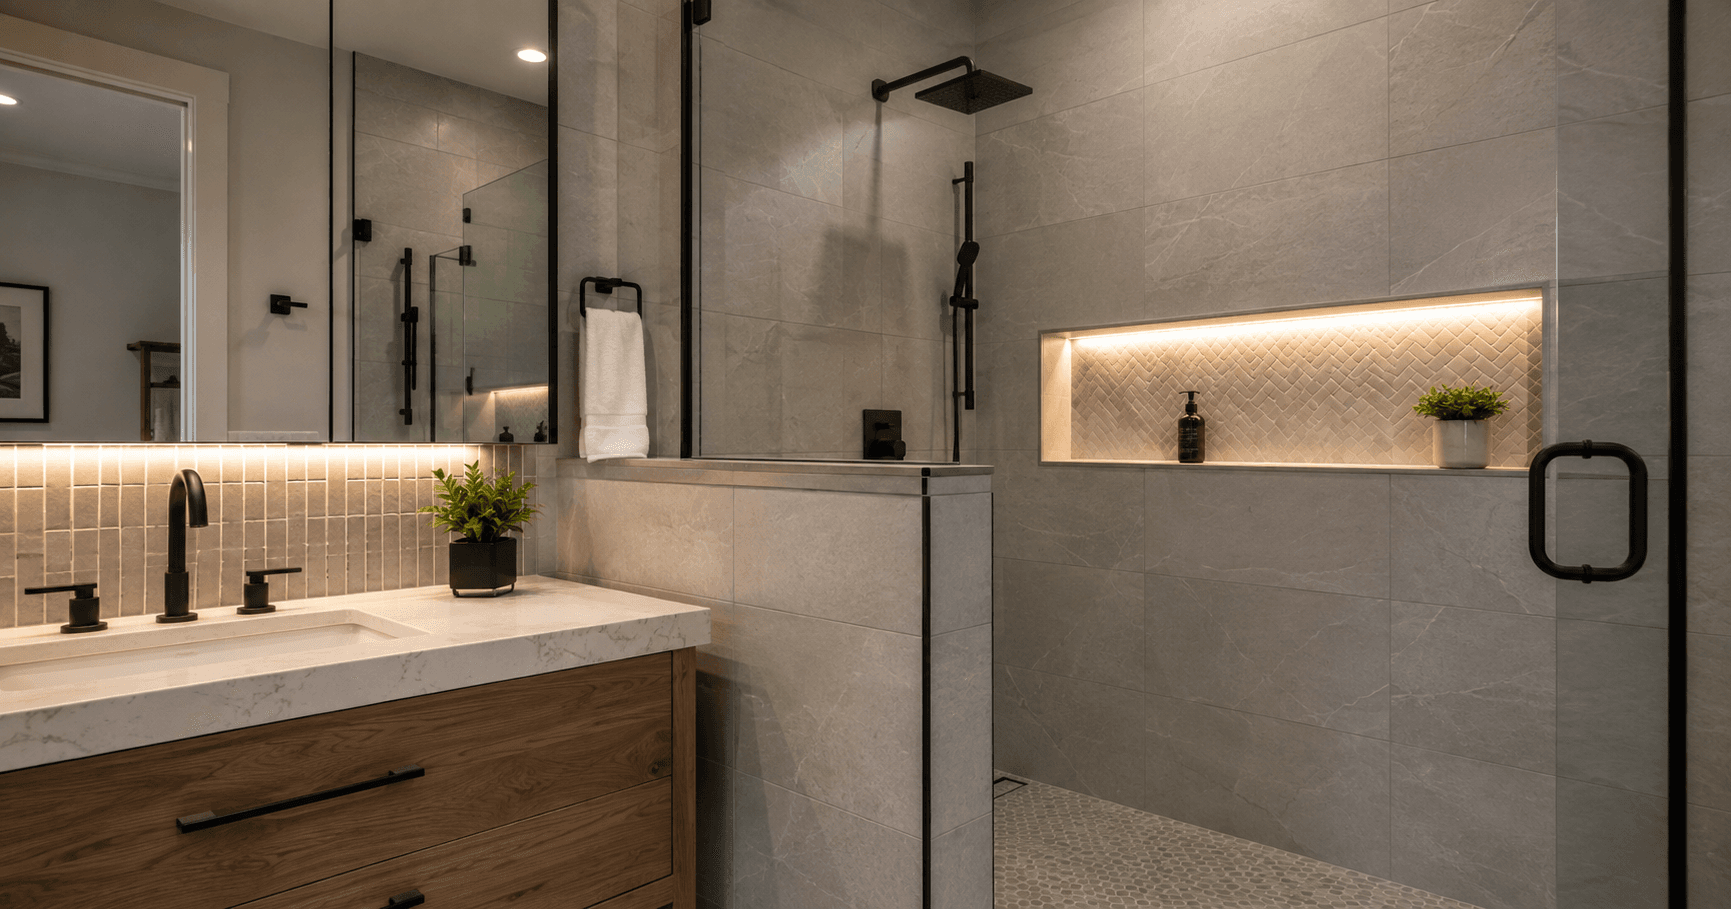
Thoughtful tile details—from niche placement and grout color to edge finishing—can change how polished a finished bathroom feels.
Bathroom Tile Details: Backsplashes, Niches & Grout
Choosing bathroom tile is the easy part.
The harder part is deciding what happens at the corners, around the niche, behind the vanity, at the ceiling, beside the shower glass, and wherever one material meets another.
Those details may seem small when you are looking at tile samples. Once the bathroom is finished, they are often what you notice most.
A beautiful tile installed with awkward cuts, heavy grout lines, or a poorly placed niche can make an otherwise good bathroom feel unfinished. A simpler tile with thoughtful proportions and clean transitions can do the opposite.
For bathroom remodels in Seattle, Kirkland, Bellevue, Redmond, Mercer Island, Sammamish, and across the Eastside, we like to make these decisions before tile installation starts.
Here are the details worth thinking through.
Start With the Whole Wall
One of the easiest mistakes is choosing tile one wall at a time.
The shower wall, vanity backsplash, niche, floor, and surrounding finishes all belong to the same room. They do not necessarily need to match, but they should make sense together.
Before installation begins, it helps to look at the complete composition.
Where will the tile start?
Where will it stop?
Does it continue to the ceiling?
Where will the grout joints land?
What happens around the window?
Does the niche line up with the tile pattern?
Where will the shower glass meet the tile?
Thinking about the entire wall early gives the installer a much cleaner roadmap.
Full-Height Tile Walls
Taking tile all the way to the ceiling can completely change a bathroom.
It creates a more architectural look and removes the small painted strip that often appears above a shower or backsplash.
Full-height tile can work especially well behind a vanity, around a freestanding tub, or throughout a walk-in shower.
It does not automatically make a bathroom luxurious. The proportions still matter.
Large-format tile can make a full-height wall feel calm and continuous. Smaller tile creates more pattern and more grout joints, which may be exactly what the design needs.
The important part is deciding intentionally instead of stopping the tile at an arbitrary height.
Should a Vanity Backsplash Be Tile?
Not always.
Some countertops include a short matching backsplash. Other bathrooms use tile behind the vanity. In more design-focused spaces, the tile may continue from the countertop all the way to the ceiling.
Each option creates a different look.
A short countertop backsplash is simple and practical.
A tiled backsplash gives you more freedom with texture and color.
A full-height tiled vanity wall can become one of the strongest visual elements in the room.
Before choosing, look at the mirror, sconces, outlets, faucet, vanity width, and countertop together.
The backsplash is part of that composition.
Shower Niches Should Be Planned Before Tile
A shower niche is useful, but its location matters more than many homeowners expect.
It needs to work with the framing, plumbing, waterproofing, tile dimensions, and shower layout.
It should also be easy to reach without becoming the first thing you see when you walk into the bathroom.
In many projects, we prefer placing the niche on a side wall when the layout allows it. That keeps shampoo bottles and everyday products from becoming the focal point of the shower.
There is no universal rule, though.
The best location depends on the room.
Niche Size
A tiny niche can look neat in a drawing and become frustrating in daily use.
Think about what actually needs to fit inside.
Shampoo bottles can be tall. Families may need more storage than one person. Some homeowners prefer a long horizontal niche, while others like two smaller shelves.
The niche should be sized around real use, not just symmetry.
At the same time, bigger is not always better.
An oversized niche can dominate a shower wall and create more waterproofing and tile-detail work.
The goal is enough storage without making the niche feel like a display case.
Illuminated Shower Niches
Integrated niche lighting can add a subtle layer of light to the shower.
Done well, it highlights the tile and gives the bathroom a softer atmosphere at night.
Done poorly, it can feel decorative for the sake of decoration.
We generally prefer concealed lighting where the source itself is not the focus. The light should wash across the material rather than create a bright visible strip.
Electrical planning needs to happen early because the lighting, waterproofing, niche construction, and tile installation all interact.
This is not something to decide after the tile is already installed.
Matching the Niche to the Main Tile
A niche does not need contrasting tile.
Sometimes using the same material creates the cleaner result.
Continuing the wall tile through the back and sides of the niche can make it feel integrated into the architecture instead of added later.
Contrast can still work.
A mosaic, stone slab, or different tile inside the niche can create a focal point, especially in a simple shower.
The question is whether the bathroom needs another focal point.
If the room already has dramatic stone, a freestanding tub, statement lighting, or a strong vanity, the niche may look better when it stays quiet.
Mitered Tile Edges
Corners reveal a lot about tile workmanship.
One option is a metal or finished trim profile.
Another is a factory-finished tile edge when the tile collection provides one.
For certain porcelain and stone installations, mitered edges can create a very clean appearance.
A miter brings two finished tile faces together at the corner, minimizing the appearance of a separate trim piece.
This can look particularly good around niches, benches, pony walls, and outside corners.
But miters require careful cutting and installation.
They are not automatically better than trim. They are simply a different detail.
The right choice depends on the tile, budget, location, durability needs, and desired look.
Tile Trim Is Not a Failure
There is sometimes a tendency to assume every premium bathroom needs mitered edges.
It does not.
A well-selected trim profile can look extremely clean.
Metal profiles can coordinate with plumbing fixtures or disappear into the tile depending on the finish.
They can also protect exposed tile edges in areas that receive regular contact.
What usually looks wrong is not the presence of trim. It is choosing the trim after everything else has already been decided.
Edge finishing should be part of the original tile plan.
Grout Color Changes the Entire Look
Grout is not a minor selection.
With a contrasting grout color, every tile becomes individually visible.
With a closely matched grout, the installation reads more like one continuous surface.
Neither approach is universally better.
For patterned tile, contrast may emphasize the pattern.
For large-format stone-look porcelain, a closely matched grout can help create a quieter appearance.
For small mosaics, grout becomes a major part of the visual field because there is so much of it.
Look at the grout sample beside the actual tile before deciding.
White Grout Is Not the Only Neutral
Bright white grout can look crisp, but it is not automatically the right choice for every bathroom.
Warm white, light gray, beige, taupe, and other subtle shades can blend more naturally with certain materials.
The undertone matters.
A warm tile beside a cold gray grout may feel slightly off even when both colors look neutral on their own.
Grout should be selected with the tile, countertop, cabinetry, paint, and lighting in the room.
Grout Joint Width Matters Too
Two bathrooms can use the same tile and look completely different because of grout joint width.
Narrower joints often create a more continuous appearance, particularly with rectified large-format tile.
Other tile types need wider joints because of dimensional variation.
The correct joint also depends on the tile manufacturer's requirements and the actual installation conditions.
Trying to force an extremely narrow joint with tile that varies in size can make the finished installation look worse, not better.
Layout Comes Before Cutting
A good tile installer does not simply begin at one corner and see where the pattern ends.
Layout should be planned.
Ideally, the installer considers the centerlines, visible edges, niches, plumbing fixtures, benches, corners, doorways, and transitions before setting the first tile.
Sometimes moving the layout slightly can eliminate an awkward narrow strip at the opposite wall.
Sometimes the niche dimensions can be adjusted so grout joints align more naturally.
These are small changes with a large visual payoff.
Large-Format Bathroom Tile
Large-format tile continues to be popular because it creates fewer grout lines and a cleaner visual field.
It can work beautifully in contemporary and transitional bathrooms.
But bigger tile does not mean easier installation.
Walls and floors need to be prepared carefully. Layout becomes important because each cut is more visible. Shower slopes and drains need to work with the selected format.
In some shower floors, smaller tile may still make more sense because it can follow the slope toward the drain more naturally.
The best format depends on where the tile is being used.
Tile Around a Linear Drain
Linear drains can support a clean shower-floor design because the floor may slope primarily in one direction.
That can make larger tile formats possible in some layouts.
But the drain position, shower dimensions, waterproofing system, glass, and floor elevations all need to be coordinated.
A linear drain is not simply a visual upgrade.
It affects the construction of the shower.
If it is part of the design, it should be planned from the beginning.
Tile Around a Curbless Shower
Curbless showers make tile transitions especially important.
The bathroom floor and shower floor need to work together while still controlling water and maintaining proper drainage.
Depending on the design, the same tile may continue into the shower, or the shower floor may use a complementary smaller format.
Either can work.
What matters most is slope, waterproofing, drainage, and the transition between wet and dry areas.
The visual detail only works if the construction underneath works first.
Bookmatching and Vein Direction
Stone-look porcelain and natural stone often have visible movement.
Pay attention to where those veins go.
Randomly rotating heavily veined tiles can make the wall feel chaotic. Thoughtful placement can create a much more natural composition.
Some projects benefit from bookmatched slabs or panels. Others simply need the installer to lay out several pieces before setting them.
This is one of those details that is difficult to correct after installation.
Dry layout is worth the extra attention.
Bathroom Floor Transitions
The point where bathroom flooring meets hallway or bedroom flooring deserves planning too.
The transition should feel deliberate.
Floor heights may change when tile, underlayment, waterproofing, or heating systems are added.
Ideally, those elevations are considered before installation so the finished threshold is as clean as possible.
This is particularly important in remodels where new materials need to connect with existing hardwood or other flooring.
Heated Floors and Tile
Tile works well with radiant floor heating, which is one reason heated bathroom floors are popular in the Pacific Northwest.
But the heating system adds another layer to the floor assembly.
Subfloor preparation, heating elements, waterproofing where required, tile installation, transitions, and thermostat location all need coordination.
The tile selection itself is only one piece of that system.
When planned correctly, heated tile floors can make a bathroom much more comfortable during Seattle's cooler months.
Tile Behind a Freestanding Tub
A freestanding tub often creates a natural feature wall.
Tile can protect that wall while giving the tub a stronger visual backdrop.
The tile might stop at a deliberate height or continue all the way to the ceiling.
Large-format porcelain, natural stone, textured tile, and quieter neutral surfaces can all work.
Again, the question is not simply which tile looks best.
It is how the tub, faucet, wall, window, lighting, and surrounding space work together.
Too Many Tile Types
One of the easiest ways to make a bathroom feel busy is to use too many different tiles.
Shower wall tile.
Shower floor mosaic.
Bathroom floor tile.
Niche accent tile.
Vanity backsplash tile.
Tub wall tile.
Individually, each may look good. Together, they may compete.
Most bathrooms benefit from some restraint.
Repeating one material in multiple locations can make the room feel more intentional.
You can still create contrast through size, orientation, texture, grout, cabinetry, countertops, or lighting.
The bathroom does not need a different tile everywhere.
Tile Should Support the Room
The best tile installation is not necessarily the one with the most complicated pattern or expensive material.
It is the one where everything feels considered.
The grout makes sense.
The cuts feel balanced.
The niche is in the right place.
The edge detail is consistent.
The transitions are clean.
The waterproofing underneath is correct.
And the tile supports the rest of the bathroom instead of fighting for attention.
Those details are difficult to appreciate on a sample board, but they are easy to notice once you live with the finished room.
Bathroom Tile Planning in Seattle and the Eastside
Fine Element Construction provides bathroom remodeling and renovation services across Seattle, Kirkland, Bellevue, Redmond, Mercer Island, Sammamish, and nearby Eastside communities.
Our bathroom projects can include tile layout, shower niches, full-height tile walls, backsplashes, curbless showers, waterproofing, heated floors, lighting, vanities, plumbing coordination, and finish details.
If you are planning a bathroom remodel, choose the tile early—but do not stop there.
Spend time on the details around it.
That is often where the finished bathroom starts to feel truly complete.